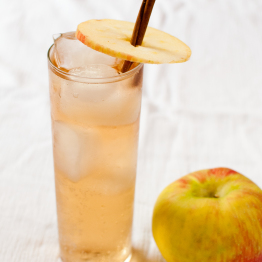
Mock “Tuna” Salad

I don’t know how many of you guys work at desk jobs, but if you do, you’re probably familiar with the most common but seemingly inevitable pitfall of a sedentary job: lunch. You know what I’m talking about – you get home at night, you’re tired, you don’t feel like making a lunch for the next day, so you tell yourself you’ll do it in the morning. When morning comes, (surprise!) you’re rushing around trying to find your left shoe and your cell phone, so you tell yourself you’ll run out at lunch to that little place down the street that only sells salads. And then of course you get swamped the second you get to the office, because you’re late (remember, you couldn’t find your shoe?). That’s when you end up pooling a few bucks with your coworkers and ordering a pizza. Lather, rinse, repeat.

By the way, I’m telling myself that this is very common because it makes me feel better to believe that I’m not the only person this happens to. Humor me, okay?

In an effort to dig myself out of this very bad habit, I’ve been trying lately to make several serving sizes of a couple of different lunch basics over the weekend, so that when I lose my shoe, I’m not by default sentencing myself to another unhealthy lunch. This mock “tuna” salad made with chickpeas is the first of the bunch, and I love it so much I may end up making it every weekend.

I don’t know that this would fool anyone into thinking that it’s actually tuna. I also think there’s no need to try to fool anyone – this is good on its own. With all the dressings and seasonings, I think the real reason people love tuna salad is the flavor. Substituting chickpeas for the tuna lends a new texture, but with the same familiar crunch of celery and onion and the same creamy dressing. If you’re a vegetarian who misses tuna salad, or a non-veg who’s just interested in a healthy, high-fiber alternative, this is definitely right up your alley.

Mock “Tuna” Salad
Print
Category: Lunch, Main Dish
Prep time: 20 mins
Total time: 20 mins
Yield: 8 servings
A healthy alternative to tuna salad using chickpeas. Serve on wraps, bread, or a bed of fresh spinach.
Ingredients
  • 2 15-oz cans chickpeas, drained and rinsed thoroughly
  • 1/2 cup Vegenaise, mayonnaise, or nonfat Greek yogurt
  • 3 Tbsp Dijon mustard
  • 4 ribs celery, diced
  • 1/2 a medium onion, diced
  • 2 Tbsp dill pickle relish
  • 1/2 tsp kelp powder (optional)
  • Pinch of cayenne pepper
  • Salt and pepper to taste
Instructions
  1. Place the rinsed chickpeas into a large bowl. Using a potato masher or the back of a fork, mash the chickpeas until no whole chickpeas remain (chickpea halves and chunks are fine – we’re not looking for a full mash).
  2. Add the Vegenaise/mayo/yogurt and Dijon mustard to the chickpeas and stir until combined and creamy.
  3. Add the celery, onion, relish, kelp powder (if using), cayenne pepper, salt, and pepper and mix well.
Notes

-Kelp powder is totally optional but adds a nice “oceany” touch if you can find it – I get mine at Whole Foods.

-For different variations, try adding diced red pepper, a handful of cranberries, or curry powder.

Source: Adapted from AllRecipes

Coconut Cream Cupcakes

I’m in Florida this week for the wedding of an old and dear friend (she’s not old, but the friendship is). Given the fact that I’m in the sunshine state, my plan was to have a treasure trove of citrusy Floridian recipes in my back pocket to share throughout the week. However, if you’ve met me in real life or have ever read this blog, you’ll know that one thing I’m not is a planner. Hence, I’ve spent all my citrus recipes, but I promise this is just as good (and maybe better). Coconut…tropical…Florida! There we go. Delicious and thematically relevant.

I made these for a little boy baby shower with a nautical theme last weekend. When the hostess of the shower chose these, I was so excited. I almost never get to make them – coconut is kind of polarizing. People seem to either love it or hate it with equal levels of passion, so it’s not generally a popular choice for group events. These, though, might be able to topple even the most dedicated coconut hater. The cake itself has barely a hint of coconut, and the shredded coconut mixed into the batter just adds a bit of moisture and texture without being overwhelming in the least. The fluffy frosting is pure vanilla, so the filling is where the real coconut magic is. Creamy and sweet, there’s just enough to pack a subtle punch without screaming “HELLO! I AM COCONUT!”  I also love how this cake domes up when baking without spilling over – I know we’re supposed to love the flat-top cupcake because it’s a better decorating canvas, but once in a while I really love to see a cake rising triumphantly beyond its means without collapsing into a muffin.

Long story short, these are cupcakes that are ideal for coconut lovers, while being subtle enough to possibly tempt coconut haters. And if the coconut haters are stubborn, more for us, right?

Coconut Cream Cupcakes
Print
Category: Dessert
A moist coconut cake with coconut filling and fluffy vanilla frosting. Yields 24 cupcakes.
Ingredients

Cupcakes:

      • 3 cups (410g) all-purpose flour
      • 1 cup (120g) sweetened flaked/shredded coconut
      • 1 Tbsp + 1 tsp (20g) baking powder
      • 1/2 tsp (2.5g) salt
      • 2 sticks (228g) unsalted butter
      • 1 1/3 cups (265g) granulated sugar
      • 4 large eggs, room temperature
      • 2 tsp vanilla extract
      • 1 1/3 cup coconut milk

Coconut Filling:

          • 7 oz sweetened condensed milk
          • 1 cup (120g) shredded coconut

Frosting:

      • 3 sticks (340g) unsalted butter, room temperature
      • 1 tsp vanilla bean paste or vanilla extract
      • 5-6 cups (500-600g) powdered sugar
Instructions
  1. Make the filling – combine sweetened condensed milk and coconut. Place in the refrigerator to chill.
  2. To make the cupcakes, preheat oven to 350 F. Line two cupcake pans with paper liners and set aside.
  3. In a medium bowl, combine flour, coconut, baking powder and salt and whisk to combine. Set aside.
  4. In a large mixing bowl or the bowl of a stand mixer, cream the butter and sugar together on medium speed until pale and fluffy, about two minutes. Add eggs one at a time, beating well after each addition. Beat in vanilla.
  5. Add 1/3 of flour mixture and beat to combine. Add half the coconut milk, followed by another third of the flour mixture. Add the remainder of the coconut milk and the rest of the flour, beating each addition until well incorporated.
  6. Fill liners 2/3 to 3/4 full. Bake 18-20 minutes, until a toothpick inserted in the middle comes out clean. Cool in pans for five minutes, then remove to racks to cool completely.
  7. To make the frosting, beat butter on medium-high speed until fluffy. Add vanilla and beat to combine. Add powdered sugar a few tablespoons at a time, beating well after each addition.
  8. To assemble, use a paring knife to cut a circular core out of each cupcake. Fill each with 1-2 teaspoons of coconut filling, depending on how filling heavy you want them. Frost and enjoy!

Source: Adapted from Pastry Affair

Shaker Meyer Lemon Pie

I have been wanting to make this pie forever. I’m not exaggerating – I think I saw this recipe at least four years ago and it’s crossed my mind more times than I can count since then. I’d see my mandoline, or a bin of big, gorgeous lemons at the grocery store, and think, “I have GOT to make that lemon pie!”  The only real reason I can think of for not doing it sooner is that I didn’t have a counter to roll out dough for the crust – and it turned out that when I finally did make it, I was pressed for time (and space, and patience) and ended up using store-bought crust.

Did you just click away in a surge of disgusted judgment? It’s okay, I understand and I’m okay with it. If you have more time and a bigger counter, sub in your favorite crust recipe – the original recipe, linked below, has one. Regardless of whether you use scratch-baked awesomeness or a simple refrigerated crust to house it, just make this pie. I’m still kicking myself for waiting four years. There’s a whole list of things I love about this pie:

  1. It uses whole lemons, peel and all. I love this. Makes me feel all efficient and non-wasteful and stuff.
  2. I get to use my mandoline (note that you don’t NEED a mandoline for this, like you kind of do with this- thinly sliced with a knife works just as well here)
  3. It feels sophisticated enough to bring to a snooty dinner party (although I guess I don’t really go to snooty dinner parties) while still being un-fussy enough to crowd around and try a few bites directly out of the pie dish while it cools.

Don’t be afraid of the whole kit and caboodle of the lemons – they macerate in sugar for a full day, and by the time they make it into the pie, any bitterness is long gone. The end result is a perfect mix of tart lemon and sugary sweetness, with a bit of chewiness from the peels surrounded by sweet, zesty lemon curd. And you don’t have to use Meyers – I did because I had just impulse bought (surprise, surprise) two bags of them, but regular lemons will yield the same result (let’s be honest, once you soak something in sugar for a day, you don’t really have to worry about what it was originally).

This is a springtime pie if ever there was a springtime pie. It deserves to cool on the windowsill in a light breeze and be served at a picnic table outside. And it definitely deserves to be made without a four year wait.

Shaker Meyer Lemon Pie
Print
Category: Dessert
A sweet-tart pie with a lemony filling that strikes a perfect balance between curd and marmalade.
Ingredients
  • 2 Meyer lemons (or regular lemons)
  • 2 cups (400g) granulated sugar
  • 1/4 tsp salt
  • 4 large eggs
  • 4 Tbsp (57g) unsalted butter, melted and cooled
  • 3 Tbsp (25g) all-purpose flour
  • 2 prepared pie crusts, or use your favorite double-crust recipe
  • Sugar, for the top crust
Instructions
  1. Wash lemons and dry thoroughly. Zest the lemons into a medium non-reactive bowl. With a mandoline slicer or sharp knife, slice lemons as thinly as possible, removing the seeds as you go. Add slices to zest and cover with sugar and salt. Stir to combine. Cover and let sit at room temperature for at least 12 hours (I did 24).
  2. Preheat oven to 425 F. Place one pie crust in a 9-inch pie plate – the edges should slightly overhang the pie plate.
  3. Whisk together eggs, cooled melted butter, and flour until well-combined. Add to lemon-sugar mixture and stir well.
  4. Pour the filling into the pie crust. Lay the other pie crust on top of the filling and seal the edges by folding the top crust over the edges of the bottom. Cut several steam vents into the top crust and sprinkle with coarse or regular sugar. Bake for about 25 minutes and reduce the oven heat to 350. Bake for an additional 30 minutes, until crust is golden brown (if the edges are browning too quickly while baking, cover them with foil).
  5. Cool on a rack for at least an hour – the filling will set as it cools. Serve at room temperature.

Source: Saveur

Mediterranean Egg White Frittata

I just realized that my last five posts have been either dessert or alcohol. Oops. I’m sorry. Or, you’re welcome. Either way.

In fairness and deference to your arteries and mine, I’ll go ahead and share one of my new favorite fast, healthy weeknight recipes. It’s also my favorite way to use up egg whites. Whenever I make something with Swiss meringue buttercream, I usually end up tossing the yolks and feeling a little guilty (but not guiltier than I’d feel if I made mayonnaise or custard or whatever other unhealthy recipe starts with egg yolks). But throwing away the whites? No way. Last week, I had a ton of whites left over from a tart (soon to be posted) and a hankering for an easy, healthy dinner packed with veggies. Ergo, this frittata.

Quick sidebar: I am currently making a note to myself that whomever created the spellcheck dictionary for WordPress was clearly not a food blogger. Every time I post, I get pinged for things like “frittata,” “buttercream,” “cremini,” and so on. Worth a letter-writing campaign? Definitely not, but surely noteworthy enough for the occasional mild gripe. Because I don’t like to get falsely spellchecked, ya know?

Sidebar #2: I just ran spellcheck and “WordPress” got flagged. Really?

Anyway. What was I talking about? Frittatas. Right. This is definitely going into the heavy rotation – quick, versatile in both ingredients and usage (brunch or dinner!), and super-healthy, you can tweak it to throw in whatever you have in the fridge, and it’s a perfect bounce-back dinner if you’ve subsisted mostly on cupcake batter in the days before. Not that I know anyone who does that.

Mediterranean Egg White Frittata
Print
Category: Brunch, Main Dish
Prep time: 15 mins
Cook time: 10 mins
Total time: 25 mins
Yield: 6 servings
The trifecta – healthy, easy, fast – for a perfect brunch or weeknight dinner.
Ingredients
  • 2 cups egg whites
  • 3 Tbsp milk or half-and-half
  • 1/4 cup reduced-fat feta cheese, crumbled
  • 1 tsp dried basil
  • 1/2 tsp dried oregano
  • 1/2 tsp dried thyme
  • 2 Tbsp olive oil
  • 1 red or green bell pepper, diced
  • 1 cup mushrooms, chopped
  • 1 clove garlic, minced
  • 2 cups baby spinach, roughly chopped
  • 1/2 cup sun-dried tomatoes, chopped
  • 1/4 cup kalamata olives, chopped
  • 3 scallions, diced (white and green parts)
Instructions
  1. Preheat oven to 400 F. Combine egg whites, milk, feta, basil, oregano and thyme in a medium bowl and whisk until frothy. Set aside.
  2. Heat olive oil in a cast-iron or ovenproof skillet. Add bell pepper and mushrooms and cook over medium heat until slightly softened, about five minutes. Add garlic, spinach, sun-dried tomatoes, and olives and cook until spinach is wilted, about two minutes. Add scallions and stir.
  3. Pour in egg white mixture. Stir constantly for about a minute until you start to see bits of cooked egg. Let sit undisturbed for two to three minutes, until the bottom begins to set. Place skillet in preheated oven and cook for 10-12 minutes, until the top is browned and the frittata is set in the middle. Let cool for about five minutes and serve with a simple salad.


Creme Egg Cupcakes


Cadbury egg recipes have been flying around the blogosphere this spring, and each time I see one, I have a little mantra I recite to myself as I frantically click the back button: “I will not make this. I will not make this.” Every day it’s gotten more and more difficult to click away, and today I cracked. I blame these creme egg brownies for pushing me over the edge. I was able to resist all of the recipes that called for scraping out creme egg middles, because it just looked like such a pain, but Lindsay’s super-easy homemade filling took away both the annoying prep work and the suspect ingredients. How could I turn away? I went straight to the kitchen before I even had time to feel ashamed of my fleeting willpower (or lack thereof).

These cupcakes are extremely rich and very sweet. Stuffed with homemade creme filling and topped with chocolate frosting and a Cadbury mini egg, one is definitely enough. I had actually wanted to top these with a thin layer of ganache rather than a buttercream, since the centers are so decadent, but I had no heavy cream on hand and no car – and frankly, rich isn’t always a downside.

The Cadbury Creme Egg brings back a lot of memories for me. My dad used to bring them home for us as a treat here and there in the weeks around Easter, and I’ll always remember how much I looked forward to him coming home from work with those foil-wrapped chocolaty treats oozing with creamy filling. As I’ve gotten older, my sweet tooth has tempered itself somewhat, and I find them to be a little too sweet for my taste buds these days. But the memory of waiting for my dad to come home on spring nights with a handful of Cadbury eggs for us? That will never be too sweet. Happy Easter, everyone!

Sources: Cake recipe from Baking Bites, filling adapted from Love and Olive Oil.

Creme Egg Cupcakes
Print
Category: Dessert
Yield: 24 cupcakes
A tribute to the Cadbury Creme Egg – chocolate cupcakes with homemade creme egg filling and chocolate frosting.
Ingredients

Cupcakes:

  • 2 cups (280g) all-purpose flour
  • 1 cup (85g) unsweetened cocoa powder
  • 2 cups (400g) granulated sugar
  • 1 tsp (5g) baking soda
  • 1 tsp (5g) baking powder
  • 1/2 tsp (3g) kosher or sea salt
  • 1/2 cup (120mL) vegetable oil
  • 2 large eggs
  • 2 tsp vanilla extract
  • 1 cup (250g) sour cream
  • 1 cup (237mL) coffee, at room temperature
  • Filling:

  • 1/2 cup (120mL) light corn syrup
  • 4 Tbsp (1/2 stick) unsalted butter, at room temperature
  • 1 tsp vanilla extract
  • 1/4 tsp salt
  • 1 1/2 cups (150g) powdered sugar
  • 1-2 drops yellow food coloring
  • Frosting:

  • 12 Tbsp (1 1/2 sticks) unsalted butter
  • 1 cup (85g) unsweetened cocoa powder
  • 3 1/2 cups (350g) powdered sugar
  • 1/4 cup milk
  • Garnish (optional):
  • Mini Cadbury eggs
  • Instructions
    1. Preheat oven to 350 F. Line two cupcake pans with paper liners and set aside.
    2. To make the cupcakes, sift flour and cocoa powder into a large bowl. Add sugar, baking soda, baking powder and salt and whisk to combine. In another large bowl, whisk together the vegetable oil, eggs, vanilla, sour cream and coffee. Pour into the bowl with the flour mixture and stir until well-mixed and smooth. Divide evenly among prepared pans, filling each 2/3-3/4 full. Bake 17-19 minutes, until a toothpick inserted in the center comes out clean.
    3. To make the filling, beat butter, corn syrup, vanilla and salt on medium speed until smooth. Add the powdered sugar a few tablespoons at a time, beating until smooth. Remove about 3/4 of the mixture to a bowl. Add 1 or 2 drops of yellow food coloring to the remaining filling and beat until color is distributed and the mixture is a deep yellow. Pour yellow mixture into white mixture and use a fork to swirl gently together (make sure the colors stay distinct).
    4. To make the frosting, beat butter on medium-high speed until light and fluffy. Beat in cocoa powder and powdered sugar alternately with the milk until frosting is the desired consistency – you want it to hold its shape. Add more milk if necessary if frosting is too stiff.
    5. To assemble, use a paring knife to cut the middle out of each cupcake (you can save the middles for cake balls or something else). Fill each cupcake with 1-2 teaspoons of the filling. Frost with a dollop of frosting and garnish with mini Cadbury eggs.