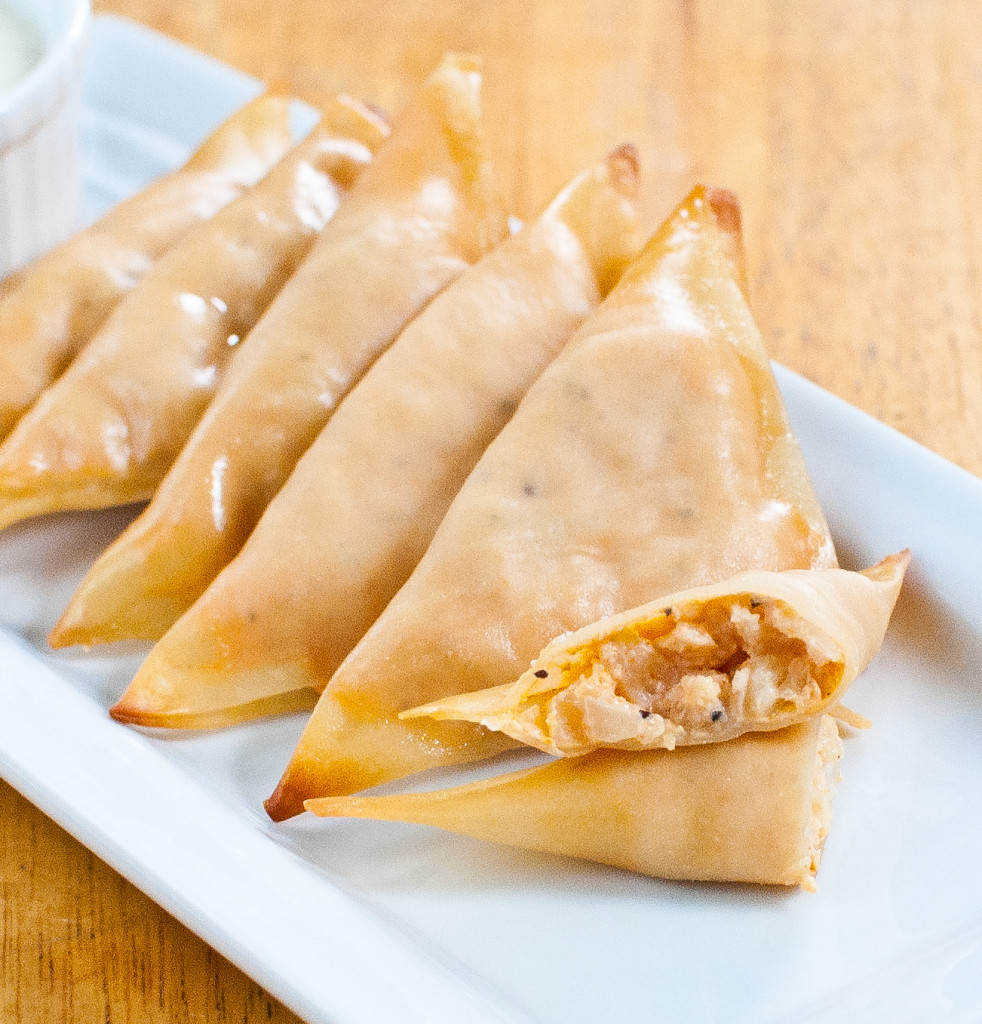
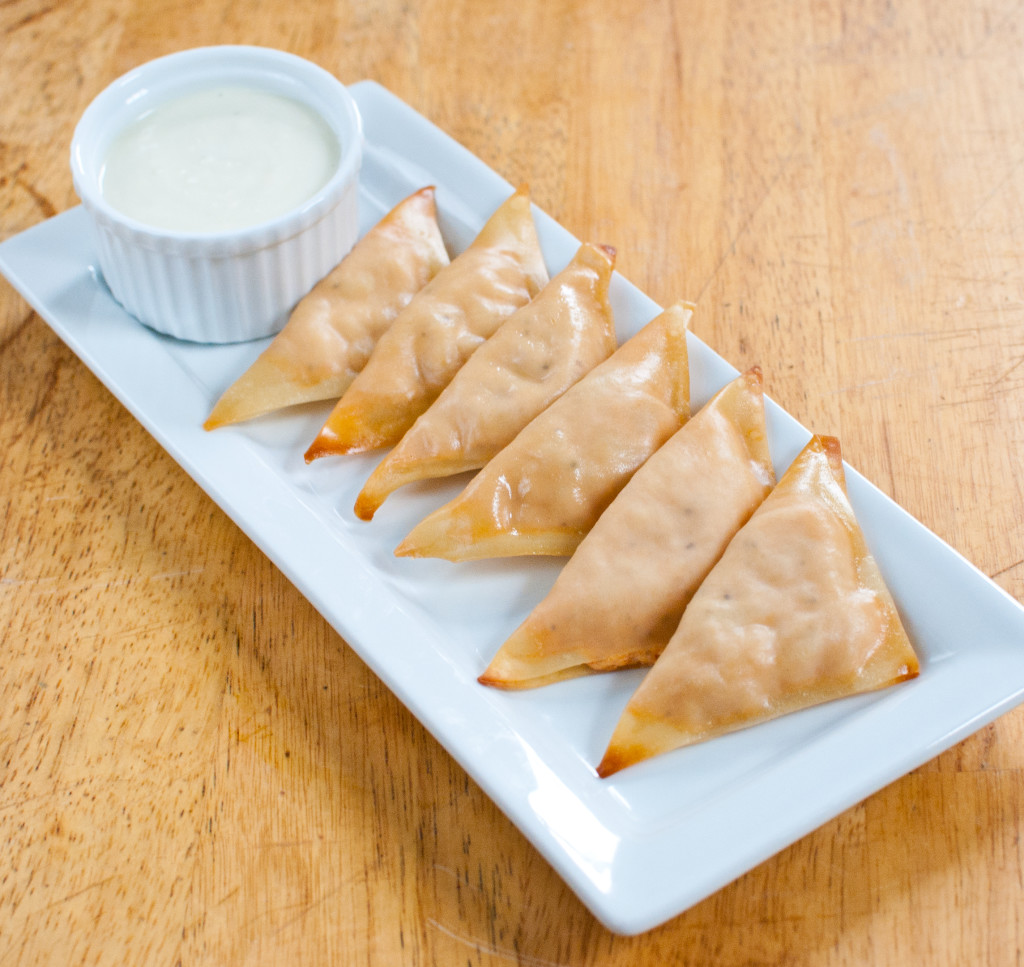
Crispy Potato Roast

Martha, Martha, Martha.

I tend to shy away from anything Martha Stewart. I steer clear of her products after being given a serviceable-looking dutch oven that I had to return after it was recalled due to a minor flaw (it exploded in people’s ovens, no biggie). And I’ve always backed slowly away from her recipes because, early on in my baking days, I attempted an uncomplicated-seeming vanilla cake recipe no less than four times, with every attempt ending in spectacular failure. Rather than blame my own fledgling kitchen skills, I of course blamed Martha. Clearly, she was trying to sabotage me – I felt entirely certain that I had uncovered a diabolical plot wherein Martha would create the perfect recipe, and then tweak the proportions just enough so that nobody would ever be able to successfully recreate the dish. It would be genius, really – with the wannabe chef now drowning in a sea of her own woeful inadequacy, where to turn but back to Martha? Who better to lift you back up than the one who dragged you down? I told myself after that first cupcake calamity that I wouldn’t fall for it, and the subsequent Martha Moratorium lived on for several years. During that time I actually learned to cook and bake, and realized that I probably should stop blaming Martha for my early on kitchen fiascos.

It was right around this time that I stumbled across this recipe, and it was a perfect storm: I had made peace with Martha, I had gotten a mandoline for Christmas, and I had a five-pound bag of organic russet potatoes that were starting to show serious signs of wear from sitting in my vegetable basket for the better part of two weeks. In addition, when I googled to reassure myself that someone other than Martha had successfully cooked and eaten this, I found that someone had – and when Deb says something is easy and good, I believe her.

Pretty even before it's cooked. Mmm, raw potatoes.

I’m not going to tell you this isn’t time-consuming. It is, a little bit, even with a mandoline. If you don’t have one, I honestly don’t know if it’s worth it – it’s a lot of slicing, and these potatoes really need to be wafer-thin. But if you’ve got one and you’re not utterly terrified of it (I have a Kevlar glove for mine – seriously), this is a great way to get some use out of it. This dish has the benefit of not only tasting good, but looking good – really good. The potatoes are browned and crispy, almost potato chippy, on top, and perfectly cooked through on the bottom. I made it on a lazy Saturday afternoon to serve alongside pistachio crusted tofu, and it kind of stole the show because it’s so ridiculously pretty. To be 100% honest, that’s really the main reason I made it – the fact that it tastes so good is just icing on the cake. More icing on the cake? The leftovers make unbelievable home fries the morning after.

Crispy Potato Roast
Ingredients:
3 Tbsp olive oil
3 Tbsp butter, melted
3 lbs russet or Yukon Gold potatoes
4 shallots, thinly sliced lengthwise
Sea salt
1/2 tsp red pepper flakes
Several whole sprigs of thyme

Instructions:
Preheat oven to 375 F. Combine butter and olive oil in a small bowl. Brush the bottom of a baking dish with about half of the mixture (Note: You may need to play around a bit with dishes for this. The original recipe calls for four pounds of potatoes, but I found that I didn’t have a baking dish big enough to fit all of them. Three pounds just fit into a 1.5 quart oval casserole dish). Sprinkle with sea salt and red pepper flakes.

Peel the potatoes. Using a mandoline slicer (or a sharp knife, tons of patience, and a bunch of elbow grease), slice the potatoes very thinly crosswise. Arrange vertically in the baking dish. Wedge the shallot slices between potatoes throughout the dish. Brush with the rest of the oil and butter mixture and season with more salt.

Bake for 1 1/4 hours (yeah, I know – put on a movie as soon as you put these in the oven). Lay the thyme sprigs atop the potatoes and bake for another 35-45 minutes, until potatoes are crispy and browned on top (cover with foil for the last leg of this marathon baking time if you notice the top browning too much). Serve immediately.

Red Velvet Cupcakes


Whenever a friend or coworker has a birthday, I send out my cupcake menu and ask them to choose a flavor so I can give them a custom half-dozen for their special day. I also tell them that they’re free to suggest something entirely different if they have a favorite flavor they don’t see, or a beloved dessert that I might be able to recreate as a cupcake. I love this, because it challenges me to get outside my comfort zone and try new things, and it’s the main reason there are now almost forty flavors on my cupcake menu. It’s how key lime, tiramisu, and cream soda cupcakes went from crazy ideas to crowd favorites, and it’s why the list continues to grow. The best part is that it seems to make people ridiculously happy to see a brand new flavor come to life purely from a fond childhood memory – it feels like a meeting of the minds, a joint effort, and I wouldn’t have it any other way.

I have a friend, though, who recently reminded me of something equally important, if not more so – that not everything enjoyable has to be exotic, or new, or particularly adventuresome. For her birthday, without even looking at the cupcake menu (I’m actually not even sure I even had to send it), she immediately chose red velvet for the third year in a row, noting that she “prefers the classics.” I jotted down her selection, made a note on my calendar, and didn’t think more about it until the night before our get-together earlier this week.

That night, I’d gotten stuck in two hours of traffic after a long day at work. Cranky and exhausted, I flipped the television to the classic rock station as I began preheating the oven, lining my cupcake pans, and rearranging the kitchen so I could plug in the mixer (yes, I actually have to reconfigure about half of my kitchen to plug various appliances into the one electrical outlet that’s not behind the refrigerator. We’ll discuss that another time). As I continued to prep, I began to notice something.

Slowly but surely, I was relaxing. Decompressing. Unwinding.

My trudging plod across the kitchen was getting lighter, and I even felt myself beginning to move a little to the music (Night Moves, for the record). As I spooned flour and sugar into measuring cups and began sifting, I realized that this felt so good and comforting and perfect because it was so wonderfully familiar and uncomplicated. I knew this recipe by heart. I didn’t need to perch my laptop precariously atop the microwave, or frantically triple-check to make sure I hadn’t mixed up baking powder and baking soda. All I needed to do was allow my mind to wander and let my hands do the work they’d done hundreds of times before. By the time I slid the pans into the oven and curled up on the couch to wait for the unmistakable signal they were almost done (that blissful scent of freshly baked cake in the air), I’d completely forgotten about the hellish ride home and the long day that preceded it.

That’s a gift. And it’s a gift that new, exciting, probably delicious but undeniably demanding experiments just can’t give. There are so many wonderful things about those – they’re challenging, they’re different, they make us feel accomplished. But often, we (ahem, I) get so caught up in variety, and making sure we’re branching out enough (whatever “enough” means to each of us) that we forget about those little things that have always made us happy, that we tend to push aside in favor of whatever’s newer and bigger and faster and better. I know I’m headed down Metaphor Avenue and taking the first right onto the Tired Cliche cul de sac, but that evening earlier this week of music and muscle memory and tension melting away reminded me how important it is to acknowledge the joy in the familiar – and that sometimes you just need to stop and smell the red velvet.

Red Velvet Cupcakes
Yield: 24 cupcakes

Ingredients:
For the cake:
2 1/2 cups cake flour
1 1/2 cups sugar
1 tsp baking soda
1 Tbsp cocoa powder
1 tsp kosher or sea salt
2 eggs, room temperature
Scant 1 1/2 cups vegetable oil
1 cup buttermilk, room temperature
2 Tbsp red food coloring
1 tsp distilled white vinegar
1 tsp vanilla extract

For the frosting:
1/2 lb cream cheese
1 cup (2 sticks) unsalted butter
1/8 cup light brown sugar, packed
4 cups confectioner’s sugar, sifted
1 tsp vanilla extract
1 Tbsp heavy cream

Instructions:
Preheat oven to 350 F. Line two cupcake pans with paper liners and set aside.

In a medium bowl, sift together flour, sugar, baking soda, cocoa powder and salt.

In a larger bowl or the bowl of a stand mixer, beat together eggs, oil, buttermilk, food coloring, vanilla, and vinegar until combined (about two minutes). Add the dry ingredients in two additions and beat on medium speed until each addition is incorporated. The batter will be liquidy.

Fill the cupcake liners about 2/3 full and bake for 18-20 minutes (until a toothpick inserted in the center comes out clean). Let cool in pans for five minutes. Remove to racks to cool completely.

To make the frosting, beat the cream cheese on medium-high speed until light and fluffy, about a minute. Add the butter and beat until combined and fluffy, about two minutes, scraping down the sides of the bowl as necessary. Add the brown sugar, salt, and vanilla and beat to incorporate.

With the mixer on low, add the powdered sugar one cup at a time, beating each addition until well-incorporated and scraping down the sides of the bowl as necessary. Add the cream and beat on medium-high until light and fluffy.

Frost the cupcakes, and then clean red food coloring off everything you’ve ever owned (it has a way). Serve immediately or keep refrigerated in a tightly closed container for up to three days. Bring to room temperature before serving.

Source: Cake recipe adapted from Cake Man Raven, frosting adapted from Joy the Baker

Pistachio Crusted Tofu

I’d be lying if I said it’s easy to keep tofu perpetually interesting. If you don’t eat meat, chances are you’ve had tofu six ways from Sunday – fried, baked, sautéed, roasted, breaded, blended, smashed, scrambled, shredded…and now I sound like Bubba. The point is, tofu can get old – if you let it. It’s all too easy to get stuck in a rut with any food. The same way a lot of people have the old go-to chicken recipe that they can whip up in a snap, but has kind of lost its zing, so goes tofu.

I don’t like to allow myself to fall into ruts, in life or in food, so I’m always looking for ways to keep foods like tofu that are staples for us interesting and fresh. It’s incredibly easy to make the same stir-fry four nights a week and have the leftovers for lunch the next day, but it’s also incredibly boring. For me, too much repetition takes the fun out of cooking, and I find myself more inclined to heat up some processed frozen garbage or order take-out rather than have the same old thing yet again. So I look for inspiration in my towering stack of cookbooks, and on the internet, which is where I stumbled upon this fantastically simple yet undeniably rut-breaking recipe. A pistachio-laden breadcrumb topping clings to getting-more-interesting-by-the-minute tofu that’s first been coated in a silky maple-mustard sauce (which is good enough to eat plain). Served with a quick homemade sweet chili dipping sauce on the side, it’s good to go in under an hour and will send that tired four-night-a-week stir-fry straight to a dark corner in the back of your mind, where it can sit and think about what it’s done.

Pistachio Crusted Tofu
Yield: 4 servings

Ingredients:

For the tofu:
1 14 oz package extra-firm tofu (not silken)
1 Tbsp soy sauce
1/2 cup panko breadcrumbs
1/2 cup shelled pistachio nuts
Salt & pepper to taste
2 Tbsp brown mustard
2 Tbsp pure maple syrup
1/2 Tbsp soy sauce
1 Tbsp Vegenaise (or mayonnaise)

For the sweet chili sauce:
Preheat oven to 400 F. Line a baking sheet with parchment paper and set aside.
1 Tbsp cornstarch
2 Tbsp water
1/2 cup rice vinegar
1/2 cup granulated sugar
1/3 cup water
2 cloves minced garlic
1 tsp minced ginger
1-3 tsp dried red chili flakes (1 for mild, 3 for hot)
1 Tbsp cornstarch
2 Tbsp water

Instructions:
Drain tofu and press lightly to remove extra water. Cut into 1/2 inch slices and brush with the tablespoon of soy sauce. Set aside while you prepare the coating.

Combine mustard, maple syrup, 1/2 Tbsp soy sauce, and Vegenaise in a bowl.

In a food processor, pulse pistachios until finely ground. Combine ground pistachios, breadcrumbs, and salt and pepper in another bowl.

Dip each slice of tofu into the maple-mustard sauce, coating evenly, then dredge in the bowl with the breadcrumb mixture. Coat each side well with the breadcrumbs. Try not to lick your fingers, even though you will have tempting alien-like bulbs of pistachio crumbs extending from them.

Place tofu on the baking sheet and bake for 15 minutes. Flip each piece over and bake for another 15 minutes, or until golden-brown. Serve warm with sweet chili dipping sauce on the side:

While the tofu is baking, prepare the sweet chili sauce. Combine cornstarch and 2 Tbsp water in a small bowl and stir to dissolve. Set aside.

Combine the rest of the sauce ingredients in a small saucepan and bring to a boil. Cook for ten minutes over medium heat, until reduced by 1/2. Reduce the heat to low and stir in the cornstarch/water mixture. Cook over low heat for another two minutes, until thickened. Remove from heat.

Source: Pistachio crusted tofu adapted from Fat Free Vegan.

Salted Nutella Sandwich Cookies

I have a cookie problem.

Not that kind of cookie problem, the kind where you pick up a bag of Chips Ahoy or a sleeve of Oreos and can’t stop eating them (okay, so I might also have that kind of cookie problem). My real, currently pressing cookie problem is that I just cannot seem to master correct baking times. Without fail, even following a recipe, my fear of underbaking takes over and I end up putting them back in and erring too far the other way. This only happens with cookies. Cupcakes? Pies? No problem. But if you’re going to call yourself any kind of baker, you have to be able to conquer the cookie. Cookies are the Taylor Swift of desserts. They’re sweet, they don’t make trouble, and there’s enough variety there that everyone likes them, even those who pretend they don’t. I like them too, maybe even love them – we’re not quite there yet – but I’m held back by the fact that cookies continue to be my kitchen kryptonite (real-life kryptonite: laundry). Allow me to illustrate for you how a typical cookie-baking session shakes out in my home:

  1. Timer dings. I eagerly open the door to my waiting sheets of perfectly set cookies.
  2. Wet, gooey dough piles stare back at me.
  3. I keep my cool and set the timer for three more minutes.
  4. Timer dings. I check again. Still unset blobs. Tentatively poke one and watch the indentation my finger made collapse into the cookie. Set the timer for two more minutes.
  5. Timer dings. Oven contains dozens of leaden, rock-like discs staring up at me. Are they…are they taunting me?
  6. Profanity.

The above is pretty much status quo when I make cookies, although I downplayed the swearing for you. I like to think that my complete ineptitude at cookie-making keeps me humble. The other upside is that this particular time, what seemed like an inevitable cookie disaster resulted in these fantastic sandwich cookies, which are positively teeming with Nutella (Italian for “chocolate hazelnut crack”).

When I once again slightly overcooked my cookies, I heaved a big sigh (after plenty of Step 6: Profanity, of course) and vowed to grin and bear it. I will not remake these just to prove that I can do it right, I repeated to myself over and over. But I had to do something - we had friends coming over to watch football, and I couldn’t bear the thought of sending them home with cookie bricks, especially if our Steelers lost (they did – curse you, Tim Tebow). The flavor was great, but they needed something that could counteract the crunch. So I hoisted my leftover half-jar of Nutella and spread a thick layer on a cookie, then topped it with another cookie and took a bite – and there it was. Alone, these cookies were just a little too crunchy to enjoy as a standalone cookie – but surrounding that creamy layer of Nutella from both sides, with the savory hint from the sea salt, they worked. Oh, did they work.

I’m learning to accept that I may never conquer the cookie, but they’ve certainly taught me to make the best of a bad situation. And I’ll take a life lesson over baking perfection any day.*

*False. I would prefer baking perfection.

Salted Nutella Sandwich Cookies
Yield: about two dozen cookies, or 12 sandwiches

Ingredients
1 1/2 cups all-purpose flour
1/3 cup cocoa powder
1 tsp baking powder
1 stick unsalted butter, room temperature
1 cup granulated sugar
1 tsp vanilla
1/3 cup Nutella or other chocolate-hazelnut spread
1/3 cup milk
Coarse sea salt for sprinkling

Instructions
Preheat oven to 325 F. Line cookie sheets with parchment paper.

In a medium bowl, whisk the flour, cocoa powder, and baking powder together to combine.

With a hand or stand mixer, cream the butter and sugar together until pale and fluffy, about 3 minutes. Mix in the vanilla and Nutella and beat until smooth, about one more minute.

Add the flour mixture and milk alternately in two additions. Beat until just combined. Cover the cookie dough and chill in the refrigerator for 20 minutes.

Roll cookie dough into one-and-a-half inch balls with your fingers and place two inches apart on baking sheets. Flatten the balls very slightly and sprinkle with the coarse sea salt.

Bake 15-17 minutes, until set. Note: if you want these chewier to serve plain, bake for 12-15 minutes.

Allow to cool on baking sheets for five minutes, then transfer to racks to cool completely.

When completely cooled, slather the middle of each cookie with a generous dollop of Nutella and top with another cookie. Pat yourself on the back for your salvaging efforts and treat yourself to one immediately.

Source: Cookie recipe from Sugarcrafter.

Chipotle Sweet Potato Soup

chipotle sweet potato soup

It always makes me a little bit sad when I see a casserole dish of sweet potatoes smothered in gooey, sugary marshmallow – “extremely orange and incredibly gross” comes to mind. Not that I have a personal vendetta against marshmallow – it has its place. It’s just that its place is not glopped upon an unsuspecting pile of perfectly innocent tubers, completely obliterating their delicate sweetness. I think the sweet potato is much better enjoyed when it’s balanced by something savory and smoky, with a little bit of heat. Oh, and in related news, soup season is in full effect. It’s cold and rainy and begging for warm, comforting goodness.

Enter Homesick Texan’s chipotle sweet potato soup. This does the sweet potato justice – the sweetness perfectly counters the kick of the chipotles, and (as if you needed a cherry on top), this is 100% waistline-friendly and pairs well with New Year’s resolutions, provided you know when to say when with the sour cream.

One final note before you run off to make this – respect the chipotle and know what you can handle, spice-wise. I boldly, bravely (read: stupidly) threw in three whole chipotles, seeds and all, and had to add an extra sweet potato to mellow it out – even then, it was still quite hot. So follow the golden rule of “do as I say, not as I do,” and start with one, then see if you need more heat and/or remove the seeds to tone it down.

Chipotle Sweet Potato Soup
Yield: 12 servings

Ingredients:
For the soup:
2 Tbsp olive oil
3 lbs sweet potatoes (five or six large), peeled and cubed in one-inch pieces
1 large onion, diced
3 carrots, peeled and sliced
3 stalks celery, peeled and sliced
1 red or orange bell pepper, diced
6 cloves garlic, crushed
1 tsp fresh ginger
6 cups vegetable stock
1-3 chipotles in adobo sauce, sliced, seeds removed if you wish to reduce the heat
1 tsp ground cinnamon
1/2 tsp grated nutmeg
2 Tbsp lime juice
Salt & pepper to taste
Cinnamon-chipotle pecans (garnish, optional, to die for, recipe below)

For the pecans:
1 cup chopped pecans
2 Tbsp butter
1/2 tsp ground cinnamon
1/4 tsp chipotle powder
Salt to taste

Instructions:
Make the pecans:
Melt butter in a small skillet over low heat. Stir in pecans and coat well with butter. Add cinnamon and chipotle powder and stir well. Cook for ten minutes.

Make the soup:
Heat the olive oil in a large pot over medium heat. Add the onion, carrots, celery, and bell pepper and cook for about 10 minutes, stirring occasionally, until softened and onions are translucent. Add the garlic and ginger and cook for two more minutes.

Add the sweet potatoes, vegetable stock, chipotles, cinnamon, and nutmeg and bring to a boil. Lower heat, cover, and cook at a simmer for 20 minutes. Sweet potatoes should be tender and easily pierced with a knife.

If you have an immersion blender, turn off the heat and puree the soup in the pot. Otherwise, let cool and transfer in batches to a blender to puree. Return to pot and add lime juice, salt, and pepper. Serve with a dollop of greek yogurt, sour cream, or creme fraiche and a sprinkling of cinnamon-chipotle pecans.

Source: Slightly adapted from Homesick Texan