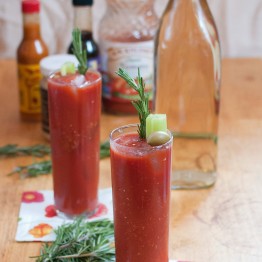
Tag Archives: gifts

DIY Vodka Infusions, Part 2 – Basil

Basil vodka was my very first at-home liquor infusion (although I posted about my second first). You’ll know everything you need to about the results by the simple fact that I haven’t stopped since. I infuse everything now – vodka, oil, vinegar, shampoo…it’s become a bit of an obsession, all because this first infusion turned out so stinking good. This one will always be my favorite, because it’s so different. You can get vodka in almost any flavor these days, from marshmallow to pomegranate, but most of the off-the-shelf flavors lean toward the guaranteed-to-be-popular sweet or fruity types. The musky, earthy scent and flavor of basil isn’t for everyone, but for me it was a welcome change (especially after trying a cloyingly sweet whipped cream flavor a week earlier…ick!).

I made the first batch of this over the holidays, while in a DIY gifting frenzy. Tragically, I gave every last bit away, but after recalling how much I’d enjoyed my taste tests (a completely necessary and non-optional step in vodka infusing, of course), I mixed up another batch to welcome spring and the beginning of basil season. I still plan to give most of it away, but have set aside a small bottle to keep this time – lesson learned!

Basil vodka mixes beautifully with citrus or berry flavors – I’ll post a recipe later this week for the cocktail I enjoyed while on a baking bender this past rainy Saturday – but it’s also pretty much custom-made for a Bloody Mary. Whatever you do with it, be sure to give some away, because a) it’s dangerous to keep too much lying around, and b) it’s fun to let your friends think you’re some sort of mad scientist.

DIY Vodka Infusions, Part 2 – Basil
Print
Category: Drinks
Make your own basil vodka – you won’t find this in the liquor store!
Ingredients
  • 1 1.5 liter bottle of good vodka (I used Svedka)
  • 1 bunch fresh basil, washed and dried
Instructions
  1. Place basil in the bottom of your glass infusion jar. Pour vodka over leaves, ensuring that leaves stay submerged. Close jar tightly and set in a cool dark place (I just use a corner of the kitchen and throw a towel over the jar – you can also refrigerate it).
  2. Allow to infuse for up to, but not more than three days. Shake gently once a day, and taste if desired to check progress. Strain through coffee filters into a large measuring cup, then use a funnel to pour back into the original vodka bottle, or into decorative flasks for gifts.
Notes

Special equipment:
Glass jar with lid
Coffee filters
Patience

Wine Jelly

I can’t even count the number of times I’ve looked at a glass of red wine and thought to myself, “you know how this would be even better? If I could spread it on crackers!”

Okay, I’m lying. I’ve never thought that. Red wine is pretty excellent in a plain old wine glass, and there’s no reason to argue otherwise. But in the interest of not leaving well enough alone (I love poking well enough with a stick!), this is a way to take the excellent and make it transcendent. We’ve all had red wine, and we’ve given it as the standard hostess gift at every dinner party we’ve been to for the last kazillion years, and that’s fine. But wine jelly? Not only is it a handmade gift from your own kitchen, but hello! It’s also wine. And it’s easy to make. And the recipe conveniently leaves a healthy glassful to relax with while you wait for your jars to seal. You don’t want it to go to waste, do you?

The first few times I gave this out, I’ll admit that I got mixed reactions: “Wine jelly…um…interesting! What do you do with it?”  Now, I get a preemptive “Are you making the wine jelly this year?” I’ve heard varying reports on what people are actually doing with it – the most common is served with cheese and crackers as an appetizer (this method has been me-tested and wholeheartedly approved), but I’ve also heard that it’s been mixed with Dijon mustard for a marinade, and I’ve even gotten a report or two that it’s been used in a grown-up version of a classic PB&J. Again, just another way to make the already-excellent transcendent.

What I love about this jelly is that you can actually taste the wine. It’s never boiled, so the alcohol doesn’t cook out. The downside of this is that you should probably not put it on your morning English muffin (unless it’s the weekend). The upside is that, like I said, you can actually taste the wine. The sugar mellows it quite a bit, and it’s not overpowering in the least. I’m not an expert on palates and finishes and all of that, but I’d describe each bite as a burst of fruity sweetness followed by a hint of the wine flavor at the very end. While it’s definitely not your standard Smuckers, it’s really, really good.

If you’re not interested in canning this for long-term storage but still want to give it as a gift, that’s absolutely fine – it will keep refrigerated for several months in sterilized jars. If you’re new to home canning but interested, I urge you to go here to read up on the basics. This was the first recipe I ever canned, and the simplicity of it got me totally hooked. Regardless of how you prepare, preserve, give or store this, I hope you enjoy it – it’s one of my all-time favorites.

Wine Jelly
Yield: about 7 half-pint jars, or 7 cups)

Ingredients:
4 cups red wine (use any red you like. I use a $9 Cabernet blend from Trader Joe’s. Also, your standard bottle is only three cups, so you’ll have to buy two bottles or a 1.5 liter for this, and then dispose of the leftovers somehow. The sacrifices you must make!)
6 cups granulated sugar
2 3-oz packets liquid pectin

Instructions:
Combine wine and sugar in a medium saucepan. Cook over medium heat, stirring occasionally, until sugar is dissolved. Do not boil. Mix in the pectin and stir until combined. Skim off foam, if any, and discard.

If not preserving, ladle into sterilized jars and refrigerate. If preserving, follow instructions here. Ladle into hot sterilized jars, leaving 1/4 inch head space, and process for 10 minutes in a water bath. Turn off heat and let stand for ten minutes, then remove and allow to stand undisturbed for 12-24 hours. You should hear the “pop” of the sealed jars within minutes of removing them, which will warm your heart while you enjoy the last bit of that wine you bought for this.

Unpreserved jelly will keep in the fridge for several months. Preserved jelly will keep at room temperature for at least one year.

Source: Food.com

Cranberry Mustard

Last weekend, in the middle of making ice (I’ll post the recipe sometime, I promise), I opened the freezer door to make sure there was room for my three freshly filled ice trays. As if reading my mind, about 90% of the freezer’s contents promptly slid out and crashed to the kitchen floor, as if to say “Here, Julie! Now there’s room!” I have very thoughtful and intuitive frozen goods. As I tried to cram them back in around the brimming ice cube trays (in an orderly fashion, of course), one stubborn bag of cranberries kept making its way back onto the floor.  After several failed attempts at creative stacking and reconfiguring, I realized that being good at Tetris didn’t mean I could defy physics. Thoroughly humbled, I resigned myself to the fact that the only place these cursed cranberries could now fit was down my gullet.

As I leafed through the “C” section of my perfectly organized recipe binder for cranberry recipes…HAHAHA. I can’t even say that with a straight face. Let me try again: As I sifted through a foot-high, unalphabetized stack of dog-eared printouts, handwritten notes, and food magazine clippings for cranberry recipes, I found myself rejecting each of them for the same reason – too Thanksgiving-y. One could argue that since we ought to be thankful for each and every day, we could easily justify eating like it’s Thanksgiving every day, but I didn’t have enough fight left in me to make that argument after the freezer incident. I had pretty much decided to toss the whole bag, but as I opened the cabinet door to replace my sheaf of recipes, my Ball Complete Book of Home Preserving fell out. As a last resort, I checked the index for “cranberry,” and sure enough, there were no fewer than 11 recipes to choose from. Before I could pick one, a bag of mustard seeds flew across the room and hit me in the face.

I’m just kidding about that part. But seriously, I am about 99% sure that I have a kitchen ghost who is really into cranberries. And canning.

I chose cranberry mustard simply because I had the ingredients lying around, and because it seemed like something that could be incorporated into other recipes. The fact that I could preserve it was even better, because it meant that I wouldn’t be stuck trying to finish some tired cranberry dish before it went bad. It also meant that I could give some away. After making it, I’m not sure how much I’ll actually end up parting with, because it’s so good I kind of want to keep it all for myself. It’s great on its own as a sharp, tart dip for pretzels, but it can also be tamed a bit for use as a veggie dip or cracker spread by mixing it with a bit of honey and some mayo or sour cream. The Ball book also informs me that it is “particularly delicious with ham and adds color or interest to meat dishes,” but since that’s out of my wheelhouse, you’ll have to report back to me. I’m also not sure if they mean you have to choose between color and interest, so let me know if you get the best of both worlds, because this was the first I’d heard of color and interest being mutually exclusive.

If you don’t want to can this for room temperature storage, you can pack it in jars and keep it in the fridge for a couple of months – but don’t be afraid of canning. It is far less intimidating than I ever thought it could be – and if I can do it, anyone can. Read up on water bath canning here - chances are you already have everything you need. And on top of the extraordinarily satisfying feeling you’ll get when you hear the series of “pop-pop-pops” indicating that your jars have sealed successfully, nothing beats knowing that you’ll have plenty of mustard to survive on when the zombie apocalypse comes.

Fact: zombies hate mustard-flavored brains

Cranberry Mustard
Yield: 7 4 ounce jars, or about 3 1/2 cups

Ingredients:
1 cup apple cider vinegar
2/3 cup whole yellow mustard seeds
1 cup water
1 Tbsp Worcestershire sauce
2 3/4 cups cranberries (fresh or frozen, but not dried)
7/8 cups sugar
1/4 cup ground yellow mustard
1 Tbsp ground allspice

Instructions:
In a medium saucepan over high heat, bring the apple cider vinegar to a boil. Remove from heat and add the mustard seeds. Cover and let stand for about 90 minutes. The seeds will expand and absorb most of the liquid.

If preserving for room temperature storage, prepare water bath canner, lids, and jars per instructions here.

Add water and Worcestershire sauce to saucepan and blend with an immersion blender until mustard seeds are well-chopped (if you don’t have an immersion blender, transfer to a food processor or blender). Add cranberries and blend until chopped – don’t worry if the texture seems too chunky right now. The cranberries will continue to break down as they cook.

Over medium heat, bring the mixture to a boil, stirring constantly. Reduce heat to medium-low and simmer for five minutes, stirring frequently. Stir in the sugar, ground mustard, and allspice. Continue to cook over medium-low heat and stir frequently until reduced by about one-third (about twenty minutes).

If preserving, ladle into hot, sterilized jars, leaving 1/4 inch headspace. Wipe rims of jars with a damp paper towel to remove any mustard residue. Place lids on jars and tighten bands until fingertip-tight. Place jars in canning pot and bring to a boil. Once boiling, cover and process for 10 minutes. Turn off heat and allow jars to sit in canner for five minutes, then remove jars and allow to cool (on a towel, without disturbing) for 16-24 hours. If not preserving, store in refrigerator for up to two months.

Source: Adapted from Ball’s Complete Book of Canning and Home Preserving

DIY Vodka Infusions, Part 1: Vanilla-Tangerine

I will not pretend to be a scientist.

If I did, I’d be exposed as a fraud almost immediately. I’m terrible at math. I don’t take notes. And (possibly most importantly) I tend to forget about things in my refrigerator for weeks at a time. Although one could argue that those forgotten fridge orphans are themselves science experiments (they sure look like it), this is still not an ideal thing to habitually do when you’re trying to slowly concoct the perfect flavor blend of infusion ingredients and booze.

All that said, I was not super confident about attempting my own vodka infusions. And frankly, from a cost-benefit perspective, there’s no real advantage to be had. Flavored vodkas are a dime a dozen these days, and they’re not expensive – from the bottom shelf to the upper mids, you can find any flavor from pomegranate to cake (???). Even the snooty Ketel One has given a nod to the common drinker and put forth a citrus offering. But there’s something just a little creepy, almost Wonka-esque, about a perfectly clear liquid tasting like pomegranates or cake without color, or an ingredient list, or any other idea how it got that way. So, cost analysis be damned, I set out to attempt to flavor my own vodkas with things you can’t find at the ABC store. I learned a lot from my first few experiments, and you can look for a post soon with overall guidelines for DIY infusions. This particular one (my second at-home infusion) was so good that I couldn’t wait to share. With the few required ingredients, a glass jar, and a little bit of patience, you’ll have a uniquely flavored liquor that makes a great gift, or is perfect for entertaining.

Vanilla-Tangerine Vodka
Ingredients
1 750 mL bottle of good vodka (don’t skimp, but don’t get crazy – anywhere in the few middle shelves will do. I personally have used Three Olives, Svedka, and Finlandia with good success).
1 vanilla bean
2 tangerines

Instructions
Split the vanilla bean in half and place it in a glass jar with a lid. Pour in vodka and put in a cool, dark place – I just put it in the refrigerator, but a cabinet or a dark corner is fine too. Let sit for three days, shaking or stirring gently once a day.

On the third day, zest the tangerines, using either a microplane zester or a vegetable peeler – you want about two tablespoons of zest. Be sure to avoid any pith (the bitter, white part of the rind will absolutely destroy your infusion – if you want bitter and white, watch Fox News).  Add the zest to the jar with the vodka and vanilla bean and stir to submerge.

Let sit in a cool, dark place for another two or three days, shaking or stirring gently once a day. Feel free to taste daily to see how it’s progressing, or just because it’s fun.

After you have tasted and are happy with the flavor, and have finished weaving around your kitchen and telling your friends how much you love them, place a coffee filter over the mouth of an empty jar and secure with a rubber band. Pour infused vodka very slowly through the filter to remove all solids.

Use a funnel to pour into small flasks (I use these) to give as gifts. Or serve at parties. Or just enjoy it yourself. I won’t judge.

Mixes well with: cranberry juice, flavored seltzer, tonic, lemon-lime soda, orange juice. Also good chilled straight up or with a bit of simple syrup.