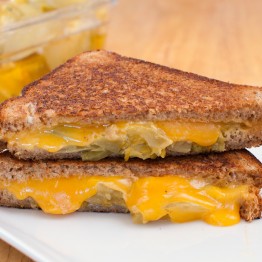
Category Archives: Quick & Easy

Blood Orange Curd

Last week, I impulse bought a 3-pound bag of blood oranges during a 6 AM trip to the grocery store. Clearly, I was not entirely awake, or I would’ve remembered the identical 3-pound bags of blood oranges I bought over the previous two winters that sat unused in my produce drawer until, shriveled and dried up, I finally had to throw them away.

When I came to my senses (thank you, caffeine), I remembered those squandered oranges and made a solemn and dramatic vow to myself that not only would I not allow this batch to go to waste, but I would use every single bit of them – pith, peel, juice – in glorious ways (okay, I threw out the seeds). I quickly got to work peeling and juicing (lesson learned: convert your kitchen into something similar to Dexter’s kill room, or risk staining everything within five feet). Then, as I proudly gazed down at my pile of zest and peels and cups of beautiful scarlet juice, I realized that I’d given exactly zero thought to what I was actually going to do with all of it. Drink it straight? Yes, I did have a cup. But after my declaration of grand destiny for this bag o’ blood oranges, simply chugging the juice seemed like a bit of a letdown.

I’d never made my own curd before – the fact that my Trader Joe’s sells lemon curd at a very reasonable price, combined with the very real potential of homemade curd ending up as sweetened scrambled eggs (ew), has always held me back. But how could I resist blood orange curd? I certainly couldn’t buy it at Trader Joe’s, and the odds of ending up with a wealth of perfectly sweet, tart, pale pink loveliness handily trumped the risk of sugary scrambled eggs.

I’m so glad I made this – it’s incredibly simple, tastes amazing, and I’ve already thought of about 354657 ways to use it, including:

  • donut filling
  • blood orange tarts
  • Swiss meringue buttercream
  • eaten alone with a spoon

In fact, I loved it so much that I made a second batch. And then I had to go out and buy another bag of blood oranges. Don’t fear for their future, though – I think it’s safe to say that you’ll never see blood oranges go to waste in my home again.

Blood Orange Curd
Print
Category: Dessert, Sauce
Yield: 1.5 cups
Bright, zesty blood orange curd is a perfect spread for scones or crumpets, or as a filling for cupcakes or doughnuts.
Ingredients
  • 1/2 cup blood orange juice
  • 1 Tbsp blood orange zest
  • 1/2 cup granulated sugar
  • 2 whole eggs
  • 2 egg yolks
  • 1 stick (1/2 cup) unsalted butter, sliced into 8 pieces
Instructions
  1. Combine juice, zest, sugar, eggs, and egg yolks in a medium bowl and whisk to combine. Set bowl over a saucepan of simmering water. Add butter and cook, whisking constantly, until thickened. The biggest potential for disaster here is in allowing the eggs to overcook – if you have a thermometer, cook until heated to about 160 F. If you don’t, that’s okay – just cook for about five minutes. The curd should feel very hot to the touch.
  2. Remove from the heat and strain through a mesh sieve to remove any bits of cooked egg. Cover surface of curd with a piece of plastic wrap (this prevents a skin from forming on the top) and allow to cool to room temperature. The curd will thicken slightly as it cools. Serve immediately or refrigerate for up to a week.

Buttermilk Ranch Dressing

There are quite a few things about college that are a little hazy for me, 10 years later (ouch).  I could blame it on the passage of time, or on the intense focus I gave my studies at the expense of all socializing and memory-making, but that just wouldn’t be true. That haze is the result of the ugly but common college blend of late nights, cheap beer, and every appalling habit that goes with those things. Chief among those appalling habits was late night snacking – I went to a small state school in southwestern Virginia whose primary claims to fame were an unusually high rate of, um, social diseases, and a 7-11 that boasted the highest daily gross in alcohol sales in the country. Oh, the pride. Although my friends and I did have a hand in the 7-11′s skyrocketing sales, I thankfully escaped without contributing to the school’s first dubious record. Due to the abundance of Natural Light, we were too busy enjoying our college town’s huge array of post-midnight dining options to get ourselves into any trouble (side note: it’s amazing how something like “abundance of Natural Light” can completely change in meaning from college years to adulthood. Then, it meant that we wouldn’t run out of horrible beer at whatever scuzzy basement party we were heading to that night. Now, it means I might be able to take a decent picture without having to go all MacGyver on my living room).

Anyway, to the point, we did a lot of after-hours eating in those days – pizza, nachos, sandwiches, crusties (sounds unappealing, but I am desperately trying to recreate them). No matter the snack, they all had one thing in common – they all came with ranch dressing. This is where I trace my affinity for ranch, and no bottled version has ever been able to match what came in those little plastic cups from takeout joints. So I started making my own. I can’t say I eat a ton of it these days – my late-night snacking days are ever fewer and farther between (okay, fine, they’re over), and nowadays I’m much more likely to put ranch on an actual salad than on a greasy pile of pizza rolls (not that there’s anything wrong with that). This homemade version is not only much healthier and far less processed than bottled ranch, but also lends itself to endless customization. Too thick? Add more milk. A little bland? Throw in some more spices. And even if you’re mostly serving it with carrot sticks these days, it’s still a good survival staple to have around when your college friends come to visit.

Buttermilk Ranch Dressing
Yield: 3 cups

Ingredients:
1/4 cup light mayonnaise
3/4 cup sour cream
1 1/2 cups low-fat buttermilk
1/2 cup milk
1/4 cup flat leaf parsley, finely chopped
1 tbsp chives, finely chopped
1 tsp fresh dill (or 1/2 tsp dried)
1 small clove garlic, finely minced
1/4 tsp paprika
1/2 tsp onion powder
3/4 tsp mustard powder
1/8 tsp cayenne pepper
1/2 tsp granulated sugar
Salt and pepper to taste

Instructions:
Combine mayonnaise, sour cream, buttermilk and milk in a bowl and whisk until smooth and well combined. Add the rest of the ingredients and stir well. Chill for at least two hours before using. Thin with more buttermilk or milk if desired.

Pistachio Crusted Tofu

I’d be lying if I said it’s easy to keep tofu perpetually interesting. If you don’t eat meat, chances are you’ve had tofu six ways from Sunday – fried, baked, sautéed, roasted, breaded, blended, smashed, scrambled, shredded…and now I sound like Bubba. The point is, tofu can get old – if you let it. It’s all too easy to get stuck in a rut with any food. The same way a lot of people have the old go-to chicken recipe that they can whip up in a snap, but has kind of lost its zing, so goes tofu.

I don’t like to allow myself to fall into ruts, in life or in food, so I’m always looking for ways to keep foods like tofu that are staples for us interesting and fresh. It’s incredibly easy to make the same stir-fry four nights a week and have the leftovers for lunch the next day, but it’s also incredibly boring. For me, too much repetition takes the fun out of cooking, and I find myself more inclined to heat up some processed frozen garbage or order take-out rather than have the same old thing yet again. So I look for inspiration in my towering stack of cookbooks, and on the internet, which is where I stumbled upon this fantastically simple yet undeniably rut-breaking recipe. A pistachio-laden breadcrumb topping clings to getting-more-interesting-by-the-minute tofu that’s first been coated in a silky maple-mustard sauce (which is good enough to eat plain). Served with a quick homemade sweet chili dipping sauce on the side, it’s good to go in under an hour and will send that tired four-night-a-week stir-fry straight to a dark corner in the back of your mind, where it can sit and think about what it’s done.

Pistachio Crusted Tofu
Yield: 4 servings

Ingredients:

For the tofu:
1 14 oz package extra-firm tofu (not silken)
1 Tbsp soy sauce
1/2 cup panko breadcrumbs
1/2 cup shelled pistachio nuts
Salt & pepper to taste
2 Tbsp brown mustard
2 Tbsp pure maple syrup
1/2 Tbsp soy sauce
1 Tbsp Vegenaise (or mayonnaise)

For the sweet chili sauce:
Preheat oven to 400 F. Line a baking sheet with parchment paper and set aside.
1 Tbsp cornstarch
2 Tbsp water
1/2 cup rice vinegar
1/2 cup granulated sugar
1/3 cup water
2 cloves minced garlic
1 tsp minced ginger
1-3 tsp dried red chili flakes (1 for mild, 3 for hot)
1 Tbsp cornstarch
2 Tbsp water

Instructions:
Drain tofu and press lightly to remove extra water. Cut into 1/2 inch slices and brush with the tablespoon of soy sauce. Set aside while you prepare the coating.

Combine mustard, maple syrup, 1/2 Tbsp soy sauce, and Vegenaise in a bowl.

In a food processor, pulse pistachios until finely ground. Combine ground pistachios, breadcrumbs, and salt and pepper in another bowl.

Dip each slice of tofu into the maple-mustard sauce, coating evenly, then dredge in the bowl with the breadcrumb mixture. Coat each side well with the breadcrumbs. Try not to lick your fingers, even though you will have tempting alien-like bulbs of pistachio crumbs extending from them.

Place tofu on the baking sheet and bake for 15 minutes. Flip each piece over and bake for another 15 minutes, or until golden-brown. Serve warm with sweet chili dipping sauce on the side:

While the tofu is baking, prepare the sweet chili sauce. Combine cornstarch and 2 Tbsp water in a small bowl and stir to dissolve. Set aside.

Combine the rest of the sauce ingredients in a small saucepan and bring to a boil. Cook for ten minutes over medium heat, until reduced by 1/2. Reduce the heat to low and stir in the cornstarch/water mixture. Cook over low heat for another two minutes, until thickened. Remove from heat.

Source: Pistachio crusted tofu adapted from Fat Free Vegan.

Roasted Tofu With Wasabi Dipping Sauce

I might need to rename this blog. I’m starting to see a theme. I wonder if “foodmostpeoplehate-butireallyloveandwantyoutoloveittoo.com” is already taken. First the brussels sprouts, and now tofu – maybe next time we’ll tackle lima beans.

Tofu and I do not go way back. When I attempted vegetarianism as a teenager, I successfully cut out meat from my diet; however, in doing so, I also invented an entirely new dietary classification known as “pizzatarian.” I wanted nothing to do with anything remotely healthy, let alone anything that contained the words “fermented” and “soybean.” I did suck down an alarming amount of processed fake meat (the creepy bacon that even has the fake fat marbling), but that was as close as I got to tofu until a few years ago.

At some point I will post the tofu recipe that won me over. This is the recipe that’s won a lot of other tofu skeptics over, though, and it’s so good and so deliciously simple that you should really probably make it tonight. The high-temperature roast gives the tofu the pleasing texture of the deep-fried tofu you often see in restaurants, without the fat and grease. The outside is perfectly browned and crispy, the inside chewy and soft. And with a side of wasabi dipping sauce, it’s nothing less than addictive. Pop out a plate in the afternoon as a quick snack, or serve for dinner with broccoli and rice. And enjoy – if I’d known how to make this in high school, Mama Celeste pizza would’ve gone out of business.

Roasted Tofu with Wasabi Dipping Sauce
Ingredients
For the tofu:
1 package extra firm tofu (not silken)
4 tsp olive oil
Sea salt and black pepper (freshly ground, if possible)

For the dipping sauce:
4 Tbsp low-sodium soy sauce
1 clove garlic, minced
1 tsp minced ginger
1 tsp dijon mustard
1 tsp rice vinegar
1/8 tsp prepared wasabi
1 tsp sesame oil

Instructions
Preheat the oven to 450 F. Line a baking sheet with parchment paper or spray with cooking spray.

Cube the tofu into 1 inch squares. In a large bowl, toss with salt, pepper, and oil, coating evenly. Toss the cubes in a single layer on the baking sheet. Roast for 15 minutes. Turn the tofu cubes over and roast for an additional fifteen minutes, until outsides are browned and puffy.

While the tofu is roasting, combine all ingredients for the dipping sauce in a small bowl and whisk to combine. Serve tofu warm or at room temperature.

Portabella Steaks

Steak is steak. I will acknowledge that. Obviously a portabella steak isn’t that reminiscent of an actual steak – you don’t have to let it rest, you don’t have to sear it first, and you don’t have to ask your guests how they like it cooked, because it certainly will not have a cool pink center (if it does, there is something very wrong with your mushroom and you should immediately throw it away and send the grocery store a strongly-worded email). However, there really is something about a big juicy bite of a grilled portabella mushroom that reminds me of meat. Maybe that’s because it’s been years since I’ve eaten an actual steak and I’ve forgotten what they taste like, or maybe it’s because of the supposed umami* the mushroom embodies. Regardless, this is the one thing I feel like I can throw on a grill at a barbecue that doesn’t result in people casting sympathetic glances my way as they tear into their steaks. It’s hearty and fulfilling, and won’t leave you missing actual steak at all. It also goes from grocery bag to table in under 45 minutes (including marinating time). That being my first and pretty much only criteria for weeknight dinners, it’s heavily in the rotation around here.

*Umami is supposedly the fifth taste category that the human taste buds can discern – the one that doesn’t fit neatly into the previously defined sweet/sour/salty/bitter packages. Translated simply, it means “delicious,” but the umami flavor is generally defined as meaty, robust, or savory. Umami’s discoverer, Japanese researcher Kikunae Ikeda, identified the broken down form of the amino acid glutamate (L-glutamate) as the source of the umami taste. Guess what’s super-rich in glutamate and hence, really delicious when cooked? Yep – mushrooms. This is allegedly why mushrooms are so often used as a meat substitute, and why the texture and mouthfeel of a grilled portabella is so very steaky.  I’m not sure I buy all of that, because I’m a simpleton and my reaction is more along the lines of “chomp chomp chomp, were you saying something?”

Portabella Steaks
Ingredients
1 ½ lbs whole portabella mushrooms (about 6)
½ cup extra virgin olive oil
½ cup balsamic vinegar
1/3 cup freshly squeezed lemon juice
2 garlic cloves, minced
2 Tbsp chopped flat leaf parsley
Salt and pepper to taste

Instructions
Preheat the broiler or fire up your grill. Or, if you’re me, put a grill pan on your stove and coat it with an equal mixture of Pam and your own tears, because you don’t own a grill and your oven is so old that the broiler is actually a drawer underneath the stove that licks tongues of hungry flames upon your food as soon as you open it, charring it beyond recognition and causing a cringing Pavlovian response every time someone says “broil.”

Place the mushrooms in a large, shallow dish (either a large baking dish or rimmed baking sheet will work well) Combine the olive oil, balsamic vinegar, lemon juice, garlic, and parsley in a bowl and mix well. Pour over mushrooms and season with salt and pepper. Marinate for 30 minutes, turning once.

Place the mushrooms on a grill grate (or aforementioned grill pan) or broiler pan (gill side down if grilling, gill side up if broiling) and cook for 4-6 minutes per side. The mushrooms should give off some of their natural liquid and be mostly firm to the touch. Serve hot.

Source: adapted from Williams Sonoma